Next
Previous
Showing posts with label Windows. Show all posts

Sunday, 8 June 2014

0

How to Login Multiple Skype Accounts at the same time..

Posted in ,

Step 1:Go to Skype installation path on your computer

Example: C:\Program Files\Skype\Phone

Step 2: Right Click on Skype.exe icon

Step 3:Select Send to –> Desktop(create shortcut)
Now it will create a Skype shortcut on your desktop

Step 4: Right Click on the Skype icon which you have newly created

Step 5: select Properties

Step 6:In target feild, at the end of the path give a space and followed by the text " /Secondary "

Saturday, 31 May 2014

0

Cracking a Wifi (WEP) Password :-

Posted in , ,
========================
-METHOD 1 :: Getting Past a Log In Password.
----------------------------------------------------------------
1) Boot the computer in safe mode.
2) Click “Start”.
3) Click “Run”.
4) Type in “control userpasswords2”. [1]
5) Change passwords for any account.This is probably going to be obvious to the user, so you may have to tell them a little white lie. Try something along the lines of: "Oh, I hear computers glitch like that sometimes. You can always type in recoverpassword if you get locked out and then set a new
6) Reboot the computer.
-METHOD 2:: Getting Remote Access
--------------------------------------------------
1) Download the program LogMeIn. There is a free version, though you can purchase a subscription if that better meets your needs. [3]
*.The program will need to be downloaded to the computer you intend to remotely view or use. This makes it useful for gaining access to your computer if it is stolen or for checking up on your teen’s daytime activities during the summer.
*.You will have to make an account with the LogMeIn website in order to use the software.
2) Log in to the website.Log in to LogMeIn’s website.
3) Navigate to the “My Computers” page. It should open automatically when you sign in.
4) Add the computer you intend to remotely access.You will see an “Add computer” button on the page. Click that and fill in the info for the computer you intend to access.
5) Click the name for the computer once it’s added.
6) Log on to the computer.This means you’ll have to know the username and password for the account you’re trying to access or view.
7) Click “Remote Control”. If you’re trying to be sneaky (such as to spy on the user), try to move the mouse as little as possible and don’t click on anything.
8) Log out when you’re done.
-METHOD 3:: Cracking a Wifi (WEP) Password
------------------------------------------------------------
1) Download the necessary programs.You will need 2 programs to make this hack work: CommView (which will be used to look for vulnerabilities in the network you’re trying to access [4]) and AirCrackNG (which will break the security key itself)
*.Make sure your computer’s wireless adaptor is compatiblewith CommView.
2) Find a Network. Use CommView to scan for wireless networks. Choose a network with a WEP key and a decent signal.
3) Filter the search to that network. Right click on the network you
want to access, select “Copy MAC address”, go to the Rules tab, then MAC Addresses, enable MAC address rules, then click Action→Capture→Add Record→Both. Paste in the MAC address.
4) View Data packets.Sort out the Management (M) and Control (C ) packets so that you are only viewing the Data (D) packets.
5) Save the packets. Go to the Logging tab and enable auto saving. You may need to change the settings on the Directory size and File size. Try 2000 and 20, respectively.
6) Press the “Play” button to begin collecting. Wait until you have at least 100,000 packets.
7) Click “Concatenate Logs” under the Log tab. Make sure all of the logs are selected.
8) Export the logs. Go to the folder where the logs were saved and open the log file. Click File→Export→WireShark/tcpdump format and save it where you can find it easily.
9) Open the newly created file with Aircrack. Start Aircrack and choose WEP. Open the file and click “Launch”.
10) Enter the index number. When the command prompt opens, you’ll need to enter the index number for the target network. It is probably 1. Hit enter and wait. If it works, the key will be shown..!

Saturday, 17 May 2014

0

Delete an “Undeleteable” File

Posted in ,
Delete an “Undeleteable” File
Open a Command prompt window and leave it open.
Close all the open Programs.
Click Start,Run and enter TASKMGR.EXE.
Go to the Processes tab and End Process on Explorer.exe.
Leave Task Manager open.
Go back to the Command Prompt window and change to the directory the AVI(or undeletable file) is located in.
All the Command Prompt type DEL <filename> is the file you wish to delete.
Go back to Task Manger, click file,New task and enter EXPLORER.EXE to restart the GUI shell.
Clode Task Manger.
Open Task Manger.

Or

You can try this.
Open Notepad.exe.
Click File>Save As..>
Locate the folder where your undeletable file is..
Choose ‘All Files’ from the file type box.
Click once on the file you wanna delete so its name appears in the ‘filename’ box.
Put a “ at the start and end of the filename.
(the filename should have the extension of the undeletable file so it will overwrite it).
Click save.

It should ask you to overwrite the existing file, choose yes and you can delete it as normal.
0

Convert Mozilla Browser To Keylogger:

Posted in ,
Fact:
Whenever you login into any website using mozilla firefox browser it always ask’s
you whether you want to Save password or not for that website.

Trick:
We will be using a script that will not give the user option to save the password instead it will automatically save the passwords without user’s consent and we will retrieve them later.

The key-logger will work on the basis of a script that disables the Firefox browser to ask the user to save his password whenever he logins to a website. Thereby, allowing the Firefox to store his username and password combination automatically
without prompting the user.

Follow these steps to convert your firefox into a keylogger :

1. First and foremost, download the firefox keylogger script.

2. If you are a Windows user, then navigate to C:/Program Files/Mozilla
Firefox/Components and if you are using MAC, then navigate to Applications -> Right Click Firefox -> Show Package Contents -> Contents/MacOS/Components

3. In the downloaded rar file, you will find a script named as nsLoginManagerPrompter.js, simply extract and then copy and paste the file in the folder that is applicable to you.

4. Your Firefox keylogger is now ready and whenever anyone enters his username and password on any site,his/her details would be saved automatically which can be easily retrieved using Fire Password viewer!!!

Sunday, 27 April 2014

0

Top 10 free PC programs everyone should have

Posted in
There are millions of free and open source projects available, many of them better than any commercially available product. Below is a short listing of what we think is the best out there, broken down into ten categories.

Antivirus and malware protection

Most PC users realize that they need protection on their computer or may have an installed antivirus program from their computer manufacturer. What most don’t realize is that there are free programs that are just as good and in some cases better than the commercial products. Below are our recommendations
antivirus program: Avast! or AVG
Malware and Spyware protection: Malwarebytes

Backup solutions

There are dozens of free and commercially available backup programs for computers. Unfortunately many of those backups are stored locally, meaning if your house were to catch fire, get robbed, or if you lost your backup discs all your data would be lost. This is why when dealing with important data we suggest users use online backup services.
Online backup solution: Mozy or Dropbox

Browsers

Although Microsoft Internet Explorer comes pre-installed on Windows computers. There are several excellent free alternatives that everyone should try. These free alternatives can often be faster, have more options, and in many cases be more secure than Internet Explorer.
Internet Browser: Mozilla Firefox or Google Chrome

Compression utility

When downloading files on the Internet you’ll eventually encounter a .zip, .rar, or other compressed file. Dealing with these files can be easy with our below free file compression utility.
File compression utility: 7-Zip

Disc ripper and creation utility

Creating an audio or data CD/DVD, ripping the data from an audio CD, or creating a CD from a .ISO file can also be done freely using our below free recommendation.
CD burner utility: CDBurnerXP

E-mail

E-mail is yet another service that can be done freely. Most users today use online e-mail solutions like the one listed below. However, for those still using an e-mail client such as Microsoft Outlook we strongly suggest one or both of the below suggestions.
E-mail client: Mozilla Thunderbird
Online e-mail: Gmail

FTP, SFTP, and SSH Utility

Users who maintain their own web page or need to upload or download files to or from a server will have to use an FTP utility or a SSH client. There are many commercial programs capable of doing this but our below free recommendations beats them all.
FTP client: Filezilla
SSH client: Putty

Image editor, paint program, and picture organizer

There are many great free solutions for editing, creating, and organizing your images on your computer. Many of the programs capable of doing these tasks can be several hundred dollars, but all of the below programs are completely free.
Image editor: GIMP
Paint program: Paint.net
Picture organizer: Google Picasa

Multimedia

There are dozens of different multimedia programs with different capabilities and limitations. Below are our top free multimedia programs for watching video files and recording audio.
Audio editing and creating tool: Audacity
Video and DVD Player: VLC

Office Suite

An Office suite such as Microsoft Office is often one of the most expensive programs that a user can install on their computer. Why install these expensive programs when there are free solutions that are just as good.
Office suite: OpenOffice
Notepad and Source code editor: Notepad++

Saturday, 26 April 2014

0

How to Remove Virus Through Command Prompt

Posted in ,
Virus could be a malicious program that may copy itself and infect your pc. These viruses will unfold via USB/flash drive or from one pc to different pc by few written codes. There area unit several antivirus software system out there to get rid of viruses from pc. however there area unit some viruses or suspicious files thatcan’t be removed by any antivirus software system. Some suspicious files like autorun.inf initiate all the viruses incomputer. These files should be removed for safe operation of your computer, as a result of they will causeknowledge loss, software system damages etc. Such viruses and files is removed by victimization cmd. during this article we’ll discuss a way to take away a plague victimization electronic communication. Following steps is wont to take away a plague victimization electronic communication from your pc.

Go to begin menu and kind “cmd” within the search box or Start>all programs>accessories>command prompt.
->Open the infected drive like write , g: to travel to G drive.
->Now kind dir/w/a . it’ll show all the files of the drive as well as hidden files.
-->Locate AUTORUN.INF or any Virus and different suspicious files within the directory.
->there was no virus in my drive thus solely autorun.inf is been highlighted.
->Type command attrib -r –a –s –h to get rid of attributes of corresponding file.
->Type del autorun.inf to delete autorun.inf file.
->Now kind del virus name.exe t delete it, eg : del newfolder.exe .
(You may delete viruses by victimization following steps:
->When you notice AN Autorun.inf file or the other uncommon .exe file simply rename it.
->Syntax for rename is (rename computer filename.extension new name , for example: (rename autorun.inf virus) to rename autorun.inf file. Here I even have renamed it by “virus”.
->Now you’ll be able to access the defected drive while not touching the virus.
->To delete the renamed file move to the defected drive and choose the file you renamed.
->(Now delete the harmful renamed files.)
->You have deleted that virus with success however typically virus resides within the Recycler folder.To find this folder:
->Type cd recycler command.
->Again kind dir/w/a to find all file of the folder.
->Identify malicious files and delete them victimization on top of commands.
->Follow the on top of steps rigorously and that i suppose this data is enough to get rid of a plague victimization electronic communication simply.
->Important: ensure that no different processes being running whereas activity these actions. better of luck.


0

Short cut for Windows operating system helpful for computer section

Posted in ,

***********************
1. Windows Logo (Display or hide the Start menu)
2. Windows Logo+BREAK (Display the System Properties dialog box)
3. Windows Logo+D (Display the desktop)
4. Windows Logo+M (Minimize all of the windows)
5. Windows Logo+SHIFT+M (Restore the minimized windows)
6. Windows Logo+E (Open My Computer)
7. Windows Logo+F (Search for a file or a folder)
8. CTRL+Windows Logo+F (Search for computers)
9. Windows Logo+F1 (Display Windows Help)
10. Windows Logo+ L (Lock the keyboard)
11. Windows Logo+R (Open the Run dialog box)
12. Windows Logo+U (Open Utility Manager)
13. Accessibility Keyboard Shortcuts
14. Right SHIFT for eight seconds (Switch Filter Keys either on or off)
15. Left ALT+left SHIFT+PRINT SCREEN (Switch High Contrast either on or off)
16. Left ALT+left SHIFT+NUM LOCK (Switch the Mouse Keys either on or off)
17. SHIFT five times (Switch the Sticky Keys either on or off)
18. NUM LOCK for five seconds (Switch the Toggle Keys either on or off)
19. Windows Logo +U (Open Utility Manager)
20. Windows Explorer Keyboard Shortcuts
21. END (Display the bottom of the active window)
22. HOME (Display the top of the active window)
23. NUM LOCK+Asterisk sign (*) (Display all of the sub folders that are under the selected folder)
24. NUM LOCK+Plus sign (+) (Display the contents of the selected folder)
25. NUM LOCK+Minus sign (-) (Collapse the selected folder)
26. LEFT ARROW (Collapse the current selection if it is expanded, or select the parent folder)
27. RIGHT ARROW (Display the current selection if it is collapsed, or select the first sub-folder)

Thursday, 21 November 2013

1

How to Access Computer with Android Mobile or Iphone

Posted in ,
Did you ever wish there must be a way to remotely access the  pictures,videos,music and other files that are on your personal computer from your mobile device while you are not home? Who does not love accessing the files and documents while travelling? Did you ever regret while showing pictures to your family or friends while some of them are in your computer but not the mobile device?
p3
The solution for all the questions above is just a small app called Polkast. Which is absolutely free of cost.
Must Check:How to Create Wifi Hotspot in PC 

About Polkast:

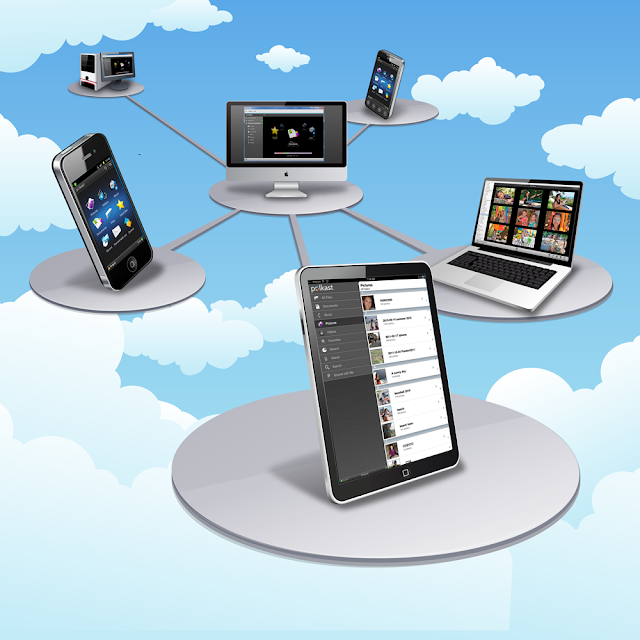
Polkast is a cloud service through which you can create your own personal cloud with the app itself. Any files on your computer you choose to share via Polkast can be remotely accessed from any mobile phone or tablet you own.
p2
This is how polkast works as we can see in the above picture. To make the polkast app work we need to install the server app on your computer and the client app on your mobile device such as phone or tab. Both the server and client versions of polkast are available as a free download from the Polkast website.

Step by Step Process to Acess Computer with Mobile:

  • Go to the Polkast website and click on the DESKTOP option as shown in the picture.
polkast+desktop
  • This directs to the download page. firstly download the server version that is the computer app version of the Polkast.
download+polkast
  • Click on the download option for windows.As soon as the download is complete, you can see the Polkast app active on your computer screen.Install the Polkast server app on your system and register an account for yourself.
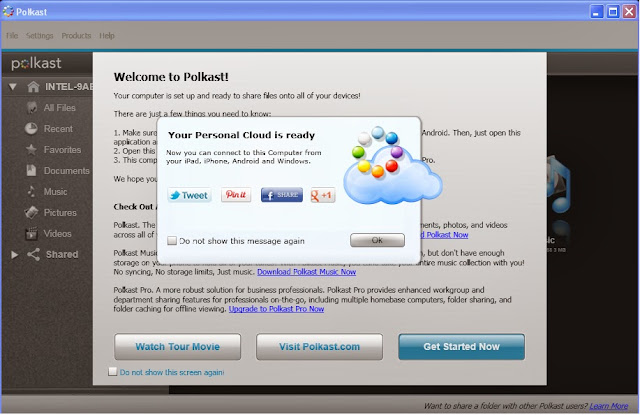
  • After the registration process is completed it directs you to Polkast working screen.click on get started now option.
pol2
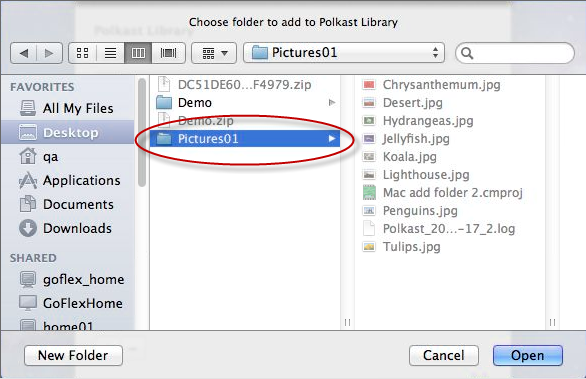
  • Next you have to choose which folders on your computer you want to access via polkast on your mobile. 
Screen+shot+2012-07-23+at+12.08.42+PM
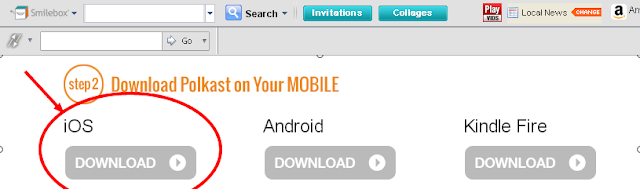
  • Polkast adds the selected files and documents you have selected to the library. Now go back to the website and download the client version of the app. As of now,I will show you the working in ios. 
05
Download it and open in the app store of your mobile phone.
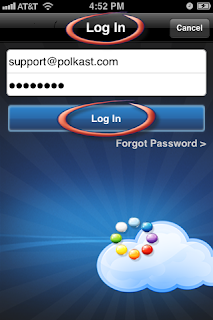
  • Once you start Polkast on your mobile phone or tablet, it will ask you to login to your polkast account.
phone1
  • After you are logged in, polkast will automatically search for your personal cloud  and connect to it. 
ph2
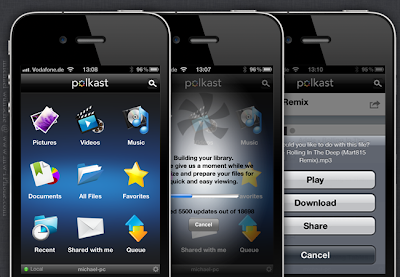
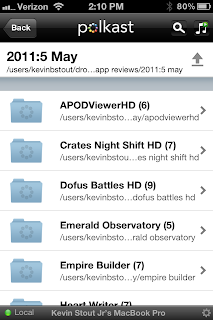
  • Once your phone successfully connects to the computer through polkast, the app dashboard will be displayed on the screen. the dashboard allows you to remotely access,browse,search and also download files from your computer.
phone4
By following the above simple steps you can watch pictures, listen to music and what ever you select from your dashboard to access from your mobile devices through Polkast. It doesn't matter where you are, you just need an active internet connection. you can also share the pictures on any social networks, edit them and save them back to your personal cloud.

Friday, 1 November 2013

0

Windows 8 With Keys.

Posted in ,

Windows 8 Genuine With Keys And Available For Download !

The much awaited Windows 8 has arrived.And it has pretty low prices if you have windows 7.But what if you want it for free ? Yep you got it,Below are The different versions of Windows 8 with their Genuine KEYS,so what are you waiting for ? grab 'em all.

WARNING : Since these keys are uploaded on internet,Microsoft will took them down soon,so hurry up.

Windows 8 Enterprise RTM -

Windows 8 Enterprise provides all the features in Windows 8 Pro (except the ability to install the Windows Media Center add-on), with additional features to assist with IT organization . This edition is available to Software Assurance customers, as well as MSDN and Technet Professional subscribers, and was released on August 16, 2012.

Download :

All in one activator:-
Instructions for activating the windows:-
-> Firstly insert the key.
-> Secondly open the kms install folder and run the setup.exe.
  That's all. your windows has been activated successfully.

Microsoft Windows 8 Professional RTM -

Windows 8 Pro is comparable to Windows 7 Professional and Ultimate and is targeted towards enthusiasts and business users; it includes all the features of Windows 8. Additional features include the ability to receive Remote Desktop connections, the ability to participate in a Windows Server domain, Encrypting File System, Hyper-V, and Virtual Hard Disk Booting, Group Policy as well as BitLocker and BitLocker To Go. Windows Media Center functionality will be available only for Windows 8 Pro as a separate software package.

KEYS -

XKY4K-2NRWR-8F6P2-448RF-CRYQH OR RR3BN-3YY9P-9D7FC-7J4YF-QGJXW
OR FB4WR-32NVD-4RW79-XQFWH-CYQG3.

Windows 8 Professional Activation Method:


1- OPEN CMD AS ADMINISTRATOR.
2- ISSUE THESE COMMANDS ONE BY ONE :

slmgr.vbs -ipk NG4HW-VH26C-733KW-K6F98-J8CK4

slmgr /skms kms-c.no-ip.org:1688

slmgr.vbs -ato
3- Restart the system.

Windows 8 Key collection :


Key : Professional;ProfessionalN;Enterprise;EnterpriseN 


G8YMN-J8F2P-WXF7F-KM4QB-2PKVC
J87JG-PXNR9-68BRP-DGJ9P-TMQHC
TNHV9-74XMY-QVT69-CV8W6-RRDHC
XR2XH-NMBQJ-T79Q6-83T78-MR9VC

Windows 8 Core :


24VQY-G6NBH-4XRFG-8H3YP-RVRDD
3MHNP-V3YQ3-6XJYK-9P93C-749T3
48H7B-NXQ2P-YKBY6-BP74B-QJXT3
4K3X9-N3CB2-TPT87-VH64M-CWCKQ
7RN69-T7DTK-WD2GF-R3MJQ-RJMQD
8N4QH-2WT9H-T7GRF-3JBKY-DPBQD
BQHHR-NW8GW-4MBJ8-YVJK6-KTJXQ
CNFQR-GK8CG-KC4BH-J2MWT-GMQG3
CYNH7-6J6VG-28CT6-4YGY3-488XQ
D2P4F-X8N86-HWGD4-9CDGH-FJMQD
DRTNR-JB93H-HGGYD-RK47B-HT663
FN426-MCYJY-28X86-3XPD8-K2BQD
FNF3P-B3Y3K-23CD9-P82JG-VCBQD
FWNFB-C28XG-FHKMF-WPC6J-K2BQD
HYTMK-MN4HC-H3T2G-CBGQR-X2BQD
M2XN7-4PT2W-H8GJF-X7D9Y-MY2KQ
MPHYQ-6NDGH-KY23Q-J2TJF-HQR9Q
N3DBK-TT4QR-C3TWM-W6CGT-H8MQD
NW388-MFMCX-DRF3V-QXG72-DC73D
NY87D-VCK7D-WM77C-K77V8-RX49Q
NYTKV-4QX68-KH34F-XTQ7H-3JXT3
PCMTP-7PNHM-JCBQF-DTYH6-TJCKQ
PW39T-8NHVC-JGCJD-CYB6F-F6V3D
Q9QX3-BNJ4R-WVGMC-RJK89-XKT63
R9MY9-FN737-H327P-D7QTC-CJ8XQ
RM96G-CWNFV-7RX24-D4THG-Y949Q
TP2X7-NQ2MR-WGJMG-XWB7K-WTV3D
VMNVQ-VH6XM-GCYW7-4X8VM-8FDG3
VR9W4-3NMR2-63GV3-P3J2D-973G3
YGB8N-6RFBV-6X3MG-J27FX-V2WXQ

Windows 8 Professional : 


26N38-JPC8B-4PTD8-3J7Q4-BY2KV
2CMGK-NMW4P-B846H-YXR6P-27F9V
2GVN8-TV3C2-K3YM7-MMRVM-BBFDH
2NF99-CQRYR-G6PQ9-WYGJ7-8HRDH
2VTNH-323J4-BWP98-TX9JR-FCWXV
39DQ2-N4FYQ-GCY6F-JX8QR-TVF9V
3MX7C-NP7DV-FV8Y6-7KK9H-46V3H
3NHJ7-3WWQK-4RFTH-8FHJY-PRYQH
3NX4V-DMFVR-4P648-3MKM3-QRPKV
3PYPC-XNYQF-2C7M2-QPC6X-T8XT7
4FCHC-6NMW2-TDY7R-6R76R-6Q4DH
4JKWV-MNJCY-8MW3Q-VJYGP-DC73H
4MKTX-N2GM8-QQR26-V74GM-B4DG7
4NMMK-QJH7K-F38H2-FQJ24-2J8XV
4RBNG-TWFTP-6272F-MVV7T-C9T67
76NDP-PD4JT-6Q4JV-HCDKT-P7F9V
7927M-4NK8W-DPTB7-QW9KB-YWMQH
793TN-FF7XH-QXTKY-2D33F-DJXT7
7F3P2-NV6JH-BPWP7-RVHFF-9WXT7
7HBX7-N6WK2-PF9HY-QVD2M-JK49V
84NRV-6CJR6-DBDXH-FYTBF-4X49V
8N3W3-QF4F4-W6F28-P4QQ7-X73G7
967N4-R7KXM-CJKJB-BHGCW-CPKT7
988NM-XKXT9-7YFWH-H2Q3Q-C34DH
BDDNV-BQ27P-9P9JJ-BQJ96-KTJXV
CDQND-9X68R-RRFYH-8G28W-82KT7
CR8NP-K37C3-MPD6Q-MBDDY-8FDG7
CYTT3-3NY42-YQ63B-GX4Y9-V2WXV
D2GBF-NGBW4-QQRGG-W38YB-BBFDH
D32KW-GNPBK-CV3TW-6TB2W-K2BQH
D7KN2-CBVPG-BC7YC-9JDVJ-YPWXV
DWV49-3GN3Q-4XMT7-QR9FQ-KKT67
DX6QP-7N6J4-7T247-TYCW6-RRDG7
F2M4V-KFNB7-9VVTW-MVRBQ-BG667
F7BDM-KTNRW-7CYQP-V98KC-W2KT7
F8X33-CNV3F-RH7MY-C73YT-XP73H
FFX8D-N3WMV-GM6RF-9YRCJ-82KT7
FJFNG-QWTD6-C9XG7-RQXKG-PDG67
FNV82-RR446-JC3R9-6C4WC-D6667
G8BND-4G737-GQM3W-FWH82-2DG67
GBJJV-YNF4T-R6222-KDBXF-CRYQH
GP89H-NXQP6-FY7K7-CVK4K-YDR9V
GPTCC-XN297-PVGY7-J8FQY-JK49V
HNRGD-JP8FC-6F6CY-2XHYY-RCWXV
HV3TW-MMNBG-X99YX-XV8TJ-2GV3H
J2HNC-BGC8H-4CY69-K3784-84YQH
J6FW2-HQNPJ-HBB6H-K9VTY-2PKT7
KNTGM-BGJCJ-BPH3X-XX8V4-K4PKV
KQWNF-XPMXP-HDK3M-GBV69-Y7RDH
MMRNH-BMB4F-87JR9-D72RY-MY2KV
MP64N-7KHDM-JJBTW-4TRKR-W8CKV
MQN4Y-CCKBW-WDH4V-RQ84W-XWXT7
N4WY8-DVW92-GM8WF-CG872-HH3G7
N9C46-MKKKR-2TTT8-FJCJP-4RDG7
N9DCG-TBM98-R2GGF-6B6GF-QGJXV
NBWPK-K86W9-27TX3-BQ7RB-KD4DH
NC2CV-P7Q6H-QM9CJ-DXRCV-X73G7
ND8P2-BD2PB-DD8HM-2926R-CRYQH
NTVHT-YF2M4-J9FJG-BJD66-YG667
P3GNB-B9FGF-HHXKF-3VK23-BG667
PKNXG-QK8QG-CHKFD-4PPMX-JW8XV
Q4NBQ-3DRJD-777XK-MJHDC-749T7
RB29C-D6NRY-BYVG3-HQ6TP-7CBQH
RN84G-HFRTT-M3D7G-JVWHV-X73G7
RRYGR-8JNBY-V2RJ9-TJP4P-749T7
T2NRP-MWCYQ-TJHD6-KF69K-T8XT7
T63QP-JN24K-VCY8P-B7FHV-FJMQH
T6HNG-PFKX9-FQVTG-WB99H-VT667
T8CHN-XJQFC-72PCQ-KDR2Q-XHF9V
TGXN4-BPPYC-TJYMH-3WXFK-4JMQH
TQV4R-BCNDK-C9MM9-WCG6K-H49T7
VF6VQ-QCNW4-MX36D-PPQFP-TMQG7
VHNT7-CPRFX-7FRVJ-T8GVM-8FDG7
VY9Q4-6HN66-2XKKK-JP72K-MG667
W6V3Y-NCMH2-4X3Y8-2DTBB-X4PKV
W93NP-RQJTC-BVKKY-VDBQK-V2WXV
WHK3K-N482H-BTY8Q-MKFJ9-3RPKV
WMJ3J-2NMH7-4WBDD-7BK7B-3GJXV
X7B3J-GNVTB-QB8D2-JKC48-BWMQH
YGMNF-FJG92-8J2V6-TBT8P-BR9T7
YY8FN-22WHK-MVQKP-PDX29-P34DH
All the above keys will be blocked by Microsoft soon,Hurry.

Support Open Source like LINUX.